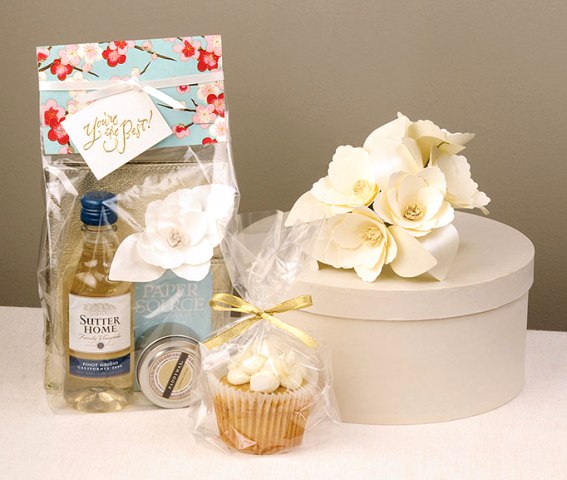
With wedding season just around the corner, we thought we’d share some cute ideas for using our cellophane bags to package up wedding favors and gifts for your bridal party and guests. Clear cellophane bags work great because they’re both affordable and flexible, making them ideal for a wide range of stuffers… and you’ll have money left over to spend on the important stuff – what’s inside!
Wedding Favor Bags
Beautifully packaged treats make wonderful wedding favors. Cupcakes fit very nicely into our food-safe cellophane bags, but you could also use a small stack of cookies, a few chocolate truffles, or even a piece of cake! To incorporate your wedding colors, insert tissue paper into the bag before you place your treats inside and choose a coordinating ribbon.
Supplies & Tools: small cellophane bags • 1/4″ satin ribbon • scissors
Directions:
1. Insert your hand into the cello bag to open it up and flatten out the bottom to create a base.
2. Arrange your treats inside the bag.
3. Gather the top of the bag about an inch or so above the treat, and tie closed with ribbon (a friend’s help at this point comes in handy… get your bridesmaids or family members involved!).
4. Tie the ribbon into a bow and neatly trim the ends.
5. Trim the top of the bag if there is a lot of excess (I left about 3 inches above the bow in this sample). And done!
Gift Bags & Welcome Packages
Fill our larger cellophane bags with gifts and present to your bridal party as a token of your appreciation. Here I included a travel candle, leather photo album, mints, mini bottle of wine, and paper flower. This gift wrapping style also works great for welcome packages that can be left in the hotel rooms of out of town guests. Include some of your favorite local treats and other things to represent your wedding location, or choose items that will make your guests’ stay a little more enjoyable.
Supplies & Tools: medium cellophane bags • 4bar flat cards • stapler • fine paper • ruler/straight edge & xacto knife or paper trimmer • 1/4” satin ribbon • cover weight paper • You’re the Best rubber stamp • gold Colorbox inkpad • gold embossing powder • heat embossing tool • 1/8” hole punch • double-sided tape • scissors
Directions:
1. To create a sturdy base for the cello bag, trim a 4bar flat card to 3” x 4.875” and place in the bottom of the bag.
2. Arrange your goodies inside.
3. Fold the top of the bag down once to close, and staple to secure.
4. For the decorative paper wrap at the top of the bag, trim your paper into rectangles that are 5” wide by about 6” tall (you can adjust based on your preference). Fold in half so that you have a folded piece that is 5” wide by 3” tall.
5. Apply a strip of double-sided tape to the bottom inside edges of this folded paper, place over the top of the cello bag, and press to secure.
6. To create the tag, trim cover weight paper to desired size of tag (I used 2.5” x 1 3/4”). Rubber stamp onto each card and emboss with gold embossing powder. Use a 1/8” hole punch to make a hole in the top right corner of the tag.
7. Cut a piece of ribbon that is 18” long, wrap around the top of the bag, and tie closed in the front, inserting the tag before knotting. Trim ribbon ends.
As with all craft projects, you’ll find that things go faster if you work in assembly line format. For example, someone could be stuffing the goodies into the bags, another person closing the bags and adding the paper wrap at the top, and then someone putting on the finishing touches! It also helps to prep your materials before beginning: cut all of your ribbon to the proper length, cut and fold all of the decorative paper, create all of your embossed tags, and trim all of your 4bar cards. Working in this way can make even big projects much more manageable and your results will probably look more consistent!
–Alanna
PS colors: gravel & plum
Latest fave: Faux Bois Soap Set


Love this!!!!!!!
Will you just look at that cupcake! Seriously, what is cuter than that packaging?
This is awesome. Please check out my blog! We only use PaperSource decorative papers and ribbons for all of our dessert tables! Amazing product and ideas!