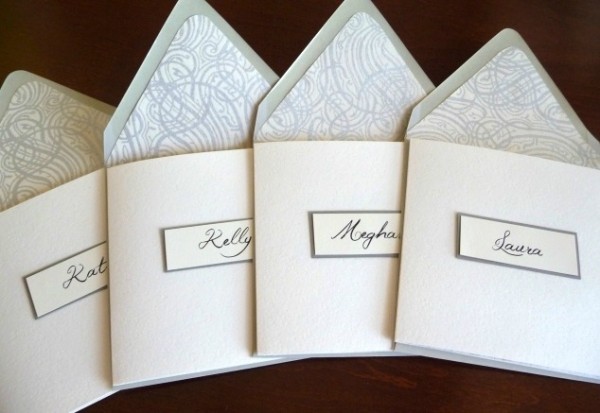
Newly engaged and in the beginning stages of planning my wedding, something I was really looking forward to was asking a few dear friends to be my bridesmaids. I wanted to do this in a way that would make the girls feel special and would help them look forward to a year of wedding fun! I scoured the internet in search of will you be my bridesmaid ideas, but nothing seemed quite right. Then, with perfect timing, my colleague Liz presented her holiday gift, which included an ingenious enclosure with recipe card inserts. It was so darling and the perfect format for my “will you be my bridesmaid,” presentation!
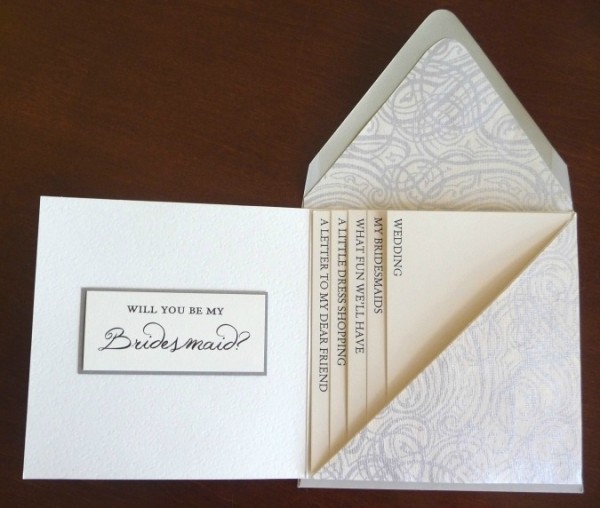
Using Liz’s recipe ensemble as my guide I printed cards with information I wanted my bridesmaids to have. The cards were cut with varying widths allowing the card titles to appear in succession. I printed and mounted a Will You Be My Bridesmaid? tag on the inside panel, which greeted the girls as they opened the enclosure. In all this project took diagonal enclosures, fine paper for liners and decorative elements, cover weight 8.5 x 11 paper cut down, and free fonts found online.
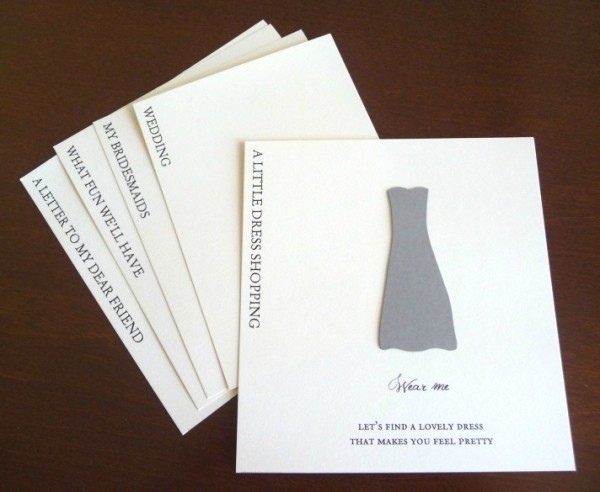
The cards included: our wedding date and location, the list of bridesmaids, rehearsal and wedding day details, a personal letter to each bridesmaid…and my favorite, a card with the silhouette of a bridesmaid dress to represent the bridal shopping to come.
This project was so worth the extra time – I will never forget the smiles and tears that came when my friends opened their packages. I know they will spend a year making me feel incredibly special, so I was happy to do the same for them while asking them one very important question.
–Kristen
PS colors: peacock & cement
Latest fave: Printable Labels


These are precious, I absolutely love this idea and that it plays off the wedding invitation “tabs” – they’re fantastic!!
What a lovely idea, that could be used for so many types of invitations (baby shower/bridal shower comes to mind!) Kristen, would you mind sharing the name of the font you used for the “Wear me”, “Bridesmaid”? Thanks!
So sweet and lovely. What are the fonts?
Sweet idea… I love it!
Where do we find Liz’s recipe ensemble? These are gorgeous!
The script font is called Jellyka Western Princess. It’s lovely and has a handwritten feel complete with imperfections in the ink coverage.
These are just lovely, and so unique xx
BEAUTIFUL!!
I love it! I am trying to put it together. However, I am stuck on how to print it out? Did you just use your home printer? Or did you have it done professionally?
Thank you!
Karen – Yes, I just used Word and my home printer…nothing fancy. If your printer can feed small cards you and print right onto square cards…if not, you can print onto 8.5 x 11 cover weight paper and trim them down to size. Just make each card slightly smaller width-wise so you get the tabs on the left.
Hi! I’m not very good with microsoft word programming. How did you get the wording “A little dress shopping” “wedding” on the left side of each card to be formatted sideways?
Maureen, if you type your text into individual text boxes (instead of straight into the Word document), you can control the placement and rotation of each text box. In my version of Word you go to Insert, then Text Box – enter your text into the box that appears. You may have to remove a default outline/border if it applies one. Click on the text box and in the Format tab there is a place to control rotation – rotating 90 degrees will give the desired affect.
If you have trouble finding these controls in Word, try Google for where to find specific functions in your version of Word.
Maureen, if all else fails, print out the wording for your tabs regularly, then cut strips and adhere to each side.
Kristen- you’ve inspired me to make something similar!! thank you!! what did your “what fun we’ll have” page look like? i have the information but am having a hard time organizing it beautifully.
Would you be able to share or email templates for this idea?
I also love this idea and would love it if you could share any templates you have.
Thanks
Hi, I would also love a template if you have one. Would you be able to email it to me?
Thank you!
Jackie
This is such a great idea! Thanks for sharing. If you have a template or pictures of each page could you please email them to me. Thanks so much!
I love this!! I would love to do it for my bridesmaids! Can you please email me pictures and templates for each of these? Or do I need to do this at the store??
Thanks!!
i love this idea if you don’t mind could you send a template through I am putting my boxes together and want to do something similar
Anyone have a tutorial on this?
You can buy the cards. I bought some that say “All-in-one” card & envelope, and they’re just trifold type cards. I omitted the envelopes for mine because I thought the shimmery paper was so beautiful. They were relatively inexpensive (approx. $5)
As for the cards, I just used Pages, which comes with my iBook. I’m more used to InDesign, so it took me a bit longer using pages, but making these is totally feasible. I just made 4 boxes in Pages, all the same height and width. I printed them out when I was done. I cut off the edges and each box individually. Then arranged them so they look tabbed and then cut them using a paper cutter. Worked out well. I also foiled the titles using the MINC machine.