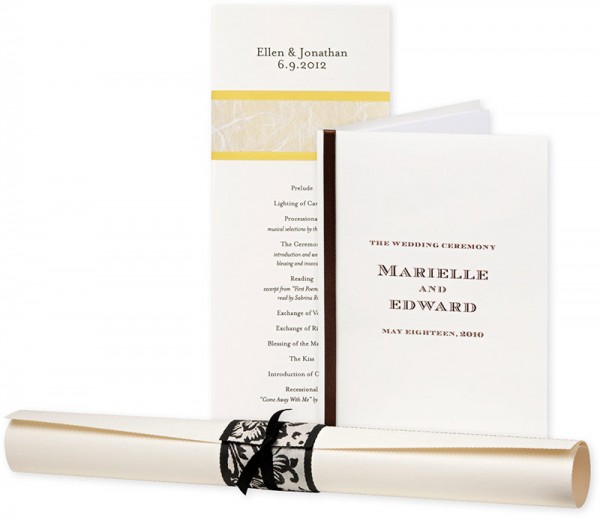
With spring and summer weddings approaching, there are sure to be lots of last-minute crafting projects and to-do’s, as you prepare (or help someone else prepare!) for the big day. Keep it simple while getting stunning results with these program ideas– the perfect way to usher in a grand affair!
With so many card sizes and colors to choose from, you can create a foundation for your program to complement any style and color palette. Then layer with a decorative sash for a fun hint of color or tie things up with ribbon to complete the job… so unique, so creative, so easy!
Here are a few tips and tricks for three basic program styles shown above:
Single Page Program
The single page program format is best suited for those who want to keep things simple, with just enough room to list the most important highlights: bride and groom’s name, wedding date, location; and either member of a bridal party, or the order of events.
You’ll Need:
- flat cards in any size/color
- decorative paper (for DIY sashes)
- adhesive tapes
- ribbons
How-to:
1) Set up your text and print cards. (For tips, visit our print template page). We printed two programs side by side to 8 1/2” x 11” cover weight paper and trimmed the printed page in half to get more bang for our buck.
2) Make your own sash from any of our solid or decorative papers (See our decorative sash how-to). Wrap the sash around each program, adhering each end to the back of the program with a piece of double-stick tape. If you prefer ribbon, our 1 ½” satin ribbon also works well as a sash. And if you feel like going all-out, add a ¼” ribbon on top of a sash and finish by tying a square knot. Watch a square knot video tutorial.
Booklet Program
This classic program format can accommodate as much or as little text as you like, so it’s perfect for destination weddings, large bridal parties, or including detail on ceremonies and traditions.
You’ll need:
How-to:
1) Create your cover by printing the fronts of the A6 folded cards. If you feel like adding a little extra, this is the perfect place to embellish with rubber stamping!
2) Set up and print your inside pages on the 8 1/2” x 11” text weight paper, making sure to use only half of the sheet (8 1/2” wide x 5 1/2” tall) so that you can fit two per sheet, and don’t forget to print the backs before trimming in half!
3) Fold the inside pages in half to fit inside the cover you’ve made out of the A6 folded cards, and bind everything together by wrapping and tying with a piece of ¼” satin ribbon. Or, for a more hand-crafted look, try baker’s twine instead!
Scroll Program
These cute little scrolls are easy as pie to make, and can add a touch of whimsy to your event!
You’ll need:
• 8 1/2” x 11” text weight paper
• decorative paper (for DIY sashes)
• ¼” satin ribbon
• double-stick tape
How-to:
1) Set up and print your programs onto a single sheet of 8 1/2” x 11” text weight paper.
2) Roll each sheet into a scroll, wrap a decorative sash around the middle, and secure with a small piece of double-stick tape.
3) Wrap a piece of ¼” satin ribbon around the scroll, over the sash, and complete by tying in a square knot.
–Alanna
PS colors: gravel & persimmon
Latest fave: Colored Dots Insulated Lunch Bag


Great ideas! Beautiful photography
These are great. Definitely for the sophisticated bride that likes clean lines.
Good info. Lucky me I found your website by chance (stumbleupon).
I have saved it for later!